Showing posts with label Photoshop. Show all posts

Thursday, May 23, 2013

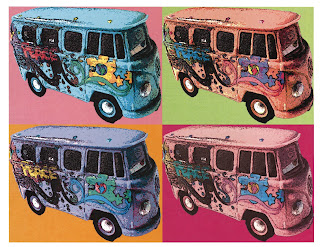
The Warhol Effect

Andy Warhol was a painter and printmaker who led the visual arts movement known as pop art.  He led a fascinating life.  When you have time, you should read more about him. 

Andy Warhol photographed by Jack Mitchell

You have probably seen his work - and imitations of it - in poster shops, on t-shirts, on mugs, online, etc.


It is a bit time-consuming, but not too difficult to achieve a Warhol effect in Photoshop.  I made this in about an hour and a half, with lots of trial and error!


Here are some examples from last year's classes:


Today I'm going to walk you through the steps for achieving this effect.  The first step is to choose an image.  It should be an image with fairly clean, strong edges.  It can be a portrait or a still life.  You need to cut it out as neatly as possible using the magnetic lasso tool.

I relied heavily on Melissa Evans' blog post for steps in achieving this effect in Photoshop.  Thank you, Melissa!

Thursday, May 2, 2013

Lyrics Project

Today we're going to start a new project in Photoshop.  Wahooooo!

This project will challenge you to use understanding of Photoshop layers as well as selection tools.  You will have plenty of room for creativity and customization!

Here are the steps:

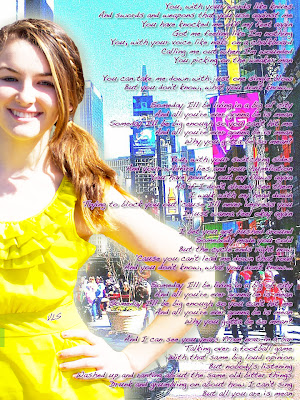
1.  Pick a song that you love and that speaks to you.  The lyrics must be appropriate for school!  I chose Mean by Taylor Swift.  Tori wants to live in NYC some day and she loves this song.

2.  Pick a picture of you that has pretty clear edges that will be easy-ish to cut out with the magnetic lasso tool.  You can do just a head shot, full body, profile, etc.  Anything works, so long as you can cut it out.  I chose a picture of Tori from Easter.  I like how her elbow sticks out and thought it would look kinda cool in the project.

3.  Pick a background. You can use a textured background, a graphic background, or a photo background.  It can be a background that you made or one that you grab online.  I used a photo that Tori took in NYC.


4.  Create an 8.5 x 14 canvas in Photoshop. Add your background image.  Duplicate that layer and then delete the original background layer.  Resize your background to make it fit the canvas.  Create a new layer, drag it to the bottom to be the background, and make it white (Edit --> Fill --> White).  This will allow you to alter your background image more easily.  Your layer panel should now look something like this:


5.  Open your portrait image in Photoshop.  You should now have two PS panels going. You can unsnap them by pulling one off the other.  Duplicate your portrait layer.  Use the magnetic lasso tool to cut out your portrait.  Choose LAYER VIA CUT after you have it cut out.  Drag the portrait cutout onto your background PS panel.  Your layer panel should now look something like this:


6.  Resize and reposition your cutout.  Make sure that your cutout layer is the one selected.  Then choose EDIT --> TRANSFORM --> SCALE.  Hold down the SHIFT key as you resize to maintain proper proportions.  Click on the MOVE tool and use it to reposition your cutout as needed.  If you want to rotate your cutout, choose EDIT --> TRANSFORM --> ROTATE.  

7.  Create a new layer and put it on top.  Drag a text box as big as you want and in the area that you want.    Paste the lyrics inside the box.  Pick your font, size, color, justification, etc.  Create cool text effects by choosing LAYER --> LAYER STYLE.  I used a bunch:


8.  Did you notice the small VLS I put on Tori's waistband?  I was able to add that pretty easily thanks to the copy and paste feature in PS.  I made a new layer, drew my text box in approximately the right place, and typed in Tori's initials.  Then I went to my layers panel.  I right clicked on the previous text layer and chose COPY LAYER STYLE.  Then I clicked on my new text layer and chose PASTE LAYER STYLE.  I quickly made the VLS on a slight angle using TRANSFORM --> ROTATE.


9.  You should now have most of your project done.  If you have time, you should play with the opacity, glow, shadow, hue, etc. for different layers.  Have fun! 


When you're done, save your project as a JPEG and post it to the blog so everyone can see it!

Wednesday, October 17, 2012

Learning More About Filters and Achieving an Impressionist Look

Some of you are still finishing up your pop art projects, and that's definitely okay!  After you've saved your pop art project as a JPEG in student common AND printed a copy for me, you are free to start our next project.

The Impressionist art movement is one of my favorites!  I was lucky enough to visit the home of Claude Monet when I visited France in high school and took an art history class on Impressionists during my study abroad in London.

Before you begin, I want you to do a little research on Impressionism.  When you can answer these questions, call me over and I'll give you the thumbs up to start.  You can take notes if you like.


  • Where did Impressionism start?
  • When did it start?
  • Name at least three famous Impressionist painters.
  • What made it different?  Be able to explain at least three qualities that make a painting Impressionist in style.
Rather than walk you through achieving this effect in Photoshop, I'd like you to use the online tutorial posted at Graphics.com titled Creating an Impressionist Watercolor Look with Photoshop Filters. I'm doing it this way because:
  1. Some of you are ready to start now and others aren't
  2. It is good for you to learn how to follow an online tutorial to learn more about Photoshop <-- this is how I've learned!
The Graphics.com tutorial is great.  It gives you step by step directions with helpful screenshots along the way.  If you get stuck, naturally I'm happy to help you.

Requirements:

  • choose a photo that you (or someone in this class) took - no borrowing pictures from the web for this one
  • can be still life, landscape, or portrait...Impressionist painters did all of these!
  • if you want to shoot something special for this, go ahead, especially if you're one of those people who finished your pop art early!
  • sign your name in a script font in the bottom right hand corner
  • make your "painting" look like it's hanging in a museum!  download a Photoshop frame OR dump your photo into Pixie and frame it (there are a bunch in a stickers folder called frames)
  • save your project as a JPEG in the student common folder and print a copy for me

Here are some examples from last year:

Katharine W.

Marie-Louise


Harrison Y.

Wednesday, May 2, 2012

Teacher Appreciation Week Design Challenge

Next week is National Teacher Appreciation Week!  Your task is to create a design in Photoshop for our school's celebration.  Here are the specifics:
  • create an 8.5x11 canvas in Photoshop - it can be portrait or landscape orientation
  • you may ONLY include photos that you or another NFS student took
  • you may use the NFS tile logos ~ I have placed them in the 7th and 8th grade common folders inside Digital Photography Elective Quarter 4
  • you may ONLY use backgrounds, clip art, brushes, etc. from the internet that are clearly identified as copy free
  • you MUST incorporate the words Newtown Friends School Teacher Appreciation Week 2012
  • you may include quotes and other phrases if you like but this not required
  • you may work alone or with one partner
All designs must be posted to this blog by the end of class on Friday.  I will have the rest of the Admin team choose the winner.  The winning design will be featured around school and on the NFS Facebook page.  The winning designer(s) will receive a free lunch from me to be delivered on Monday, May 14th (your choice - Chick-fil-a, Wendys or Slacks).

Here are some links to get your creative juices flowing:

National Education Association 2012 National Teacher Day Design
National Education Association Quotes about Teaching

Here are some places to go for copy free backgrounds and brushes:

MyPhotoshopbrushes.com

I've also put a file of school themed brushes in the DPQ4 common folder.

Wednesday, April 25, 2012

Photoshop selection tools

GOOD MORNING!
PLEASE HAVE AT LEAST TWO PHOTOS READY ON YOUR DESKTOP.


Today we're going to learn how to use Photoshop selection tools.  We will use:

  • rectangular marquee (+ shift = square) 
  • elliptical marquee (+ shift = circle)
  • magnetic lasso

Before we jump into the tools, let's practice zooming in and out with a shortcut.

  • Zoom in and out with the COMMAND and + and - keys

Rectangular marquee
  • We can use this tool to select rectangle or square parts of our photo.  Effects that you choose while the section is selected will only apply to the selected area.

Elliptical marquee
  • We can use this tool to select elliptical or circular parts of our photo.  Effects that you choose while the selection is selected will only apply to the selected area.
  • We can use this tool to create a classic vignette effect.
    • Create a new layer with a solid white fill (new layer --> edit --> fill --> white)
    • Hide the white layer
    • Use the elliptical marquee to draw an oval over the part of the photo that you want to "keep"
    • Feather the elliptical cut (select --> modify --> feather --> 30 or more)
    • Turn the white layer back on
    • Delete the oval/circle!

Magnetic lasso tool

  • Turn CAPS LOCK on to get a better icon
  • Use the [ and ] keys to change the size of the target
  • Hold the space bar to temporarily switch to the hand tool to reposition your image
  • Click your mouse to manually drop a point
TOUCH UP TRICK:

Hit Q
Select the brush tool and adjust the brush size to fit your needs
Select black if you want to deselect something from your magnetic lasso selection
Select white if you want to add something to your magnetic lasso selection
Hit Q again


  • When you have what you want selected, you can cut it out by choosing LAYER --> NEW --> LAYER VIA CUT.  You can then use the MOVE tool to drag the cutout onto a new background. If you'd like to download a background, you may do so, but choose quickly.  Today's lesson is designed to get your comfortable with these tools, not to make something groundbreaking and eternal.  Try this link - click on the type you'd like to see the choices - and then click download when you find one you like.  Variety of Photoshop backgrounds  You can also add text if you like.


Thursday, October 13, 2011

"Pieces of Me" Collage Mini-Project

One of the coolest tricks in Photoshop is transparency.  Check out this project I spied at a Philadelphia high school last night.  Yes, I took a photo with my phone while we were walking by the bulletin board!


I love the way this piece has various layers "layered" together.  I also like the way some things are tilted or rotated.  The longer you look at it, the more things you can notice.

This gave me an idea for OUR next project.  I want you to create a "pieces of me" collage.  In the collage you must use:
  • At least four images (two or more must be pictures you or a classmate has taken; the others can be from other places)
  • At least three text "boxes" (can be favorite quote, your name, important words, dates, etc..)
  • You must use at least one fancy text effect.  You can find many tutorials for Photoshop text effects online.  I recommend Photoshopessentials.com.
Today I will show you how to change the transparency of a layer and also how to create a beveled bubble look to text. 

Tuesday, September 20, 2011

Getting Started With Photoshop - Let's Check out the Toolbox!

Today we're going to play with some of the major tools in the Photoshop toolbox.  Use a portrait please as we will learn how to brush out your zits (yessssssssss!) There is a great blog post called Photoshop's Toolbox that you can refer to outside of class or if you need a reminder in future lessons.