
This project will challenge you to use understanding of Photoshop layers as well as selection tools. You will have plenty of room for creativity and customization!
Here are the steps:
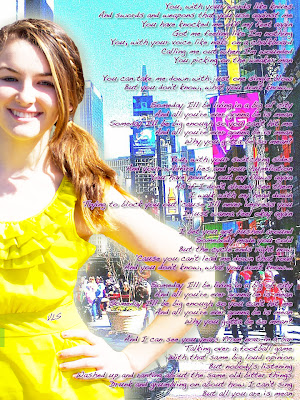
2. Pick a picture of you that has pretty clear edges that will be easy-ish to cut out with the magnetic lasso tool. You can do just a head shot, full body, profile, etc. Anything works, so long as you can cut it out. I chose a picture of Tori from Easter. I like how her elbow sticks out and thought it would look kinda cool in the project.
3. Pick a background. You can use a textured background, a graphic background, or a photo background. It can be a background that you made or one that you grab online. I used a photo that Tori took in NYC.


8. Did you notice the small VLS I put on Tori's waistband? I was able to add that pretty easily thanks to the copy and paste feature in PS. I made a new layer, drew my text box in approximately the right place, and typed in Tori's initials. Then I went to my layers panel. I right clicked on the previous text layer and chose COPY LAYER STYLE. Then I clicked on my new text layer and chose PASTE LAYER STYLE. I quickly made the VLS on a slight angle using TRANSFORM --> ROTATE.

4. Create an 8.5 x 14 canvas in Photoshop. Add your background image. Duplicate that layer and then delete the original background layer. Resize your background to make it fit the canvas. Create a new layer, drag it to the bottom to be the background, and make it white (Edit --> Fill --> White). This will allow you to alter your background image more easily. Your layer panel should now look something like this:
5. Open your portrait image in Photoshop. You should now have two PS panels going. You can unsnap them by pulling one off the other. Duplicate your portrait layer. Use the magnetic lasso tool to cut out your portrait. Choose LAYER VIA CUT after you have it cut out. Drag the portrait cutout onto your background PS panel. Your layer panel should now look something like this:
6. Resize and reposition your cutout. Make sure that your cutout layer is the one selected. Then choose EDIT --> TRANSFORM --> SCALE. Hold down the SHIFT key as you resize to maintain proper proportions. Click on the MOVE tool and use it to reposition your cutout as needed. If you want to rotate your cutout, choose EDIT --> TRANSFORM --> ROTATE.
7. Create a new layer and put it on top. Drag a text box as big as you want and in the area that you want. Paste the lyrics inside the box. Pick your font, size, color, justification, etc. Create cool text effects by choosing LAYER --> LAYER STYLE. I used a bunch:

8. Did you notice the small VLS I put on Tori's waistband? I was able to add that pretty easily thanks to the copy and paste feature in PS. I made a new layer, drew my text box in approximately the right place, and typed in Tori's initials. Then I went to my layers panel. I right clicked on the previous text layer and chose COPY LAYER STYLE. Then I clicked on my new text layer and chose PASTE LAYER STYLE. I quickly made the VLS on a slight angle using TRANSFORM --> ROTATE.

9. You should now have most of your project done. If you have time, you should play with the opacity, glow, shadow, hue, etc. for different layers. Have fun!
When you're done, save your project as a JPEG and post it to the blog so everyone can see it!
No comments:
Post a Comment