Thursday, May 23, 2013

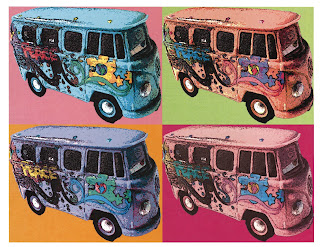
The Warhol Effect

Andy Warhol was a painter and printmaker who led the visual arts movement known as pop art.  He led a fascinating life.  When you have time, you should read more about him. 

Andy Warhol photographed by Jack Mitchell

You have probably seen his work - and imitations of it - in poster shops, on t-shirts, on mugs, online, etc.


It is a bit time-consuming, but not too difficult to achieve a Warhol effect in Photoshop.  I made this in about an hour and a half, with lots of trial and error!


Here are some examples from last year's classes:


Today I'm going to walk you through the steps for achieving this effect.  The first step is to choose an image.  It should be an image with fairly clean, strong edges.  It can be a portrait or a still life.  You need to cut it out as neatly as possible using the magnetic lasso tool.

I relied heavily on Melissa Evans' blog post for steps in achieving this effect in Photoshop.  Thank you, Melissa!

Friday, May 10, 2013

Collage Me Project

You are all unique individuals with a complex variety of talents, dreams, and interests.  The Collage Me Project asks you to show who you are in a very visual way.

This Collage Me project should take you several class periods to complete.  I want you to do it well, so take your time!

PART 1:

Create your silhouette.

1.  Open a new 11x17 canvas in Photoshop.  Make it portrait style.  You're going to put a silhouette of your body or your torso/head so it needs to be longer than wider.

2.  Go to EDIT -> FILL and fill your background with a color of your choice.

3.  Pull over a picture of you from your portrait collection.  Pick one where you are the clear focal point of the picture.  Look for something that is relatively easy to trace and that makes sense for a silhouette.  If you're climbing a tree, that's probably not a great choice.  If you want to take a new portrait just for this project, go ahead.

4.  Select the MAGNETIC LASSO tool.  Use magnetic lasso to trace your image.  Then choose LAYER -> DELETE LAYER.  You should then see your magnetic lasso marching ants on top of your background without the portrait.


5.   Next duplicate your background layer.


6.  With the background copy layer selected, hit the DELETE key to get rid of the cutout (the marching ants shape) inside your silhouette.  Then delete your original background layer.

Your project should now look something like this:


PART 2:

Fill your silhouette!

Collect at least 20 different images to put inside your silhouette.  You can use pictures that you've taken OR pictures from the web.  You can use photos, cartoons, logos, etc.  Anything goes!  Your goal is to show the many sides of you.  Don't fill in your entire silhouette with pictures of the Phillies if you're a Phillies fan.  Think about the people, places, things, and ideas that matter to you.

Remember that your canvas is 11x17 (really big!)  Zoom in to 100% when working on different parts of the collage so that you can work in "real view."  

Resize, rotate and layer the images so that they fit inside your silhouette.  There shouldn't be any empty space. 

NOTE - Your silhouette layer has to go ON TOP of all the collage images.  It's like a reverse cookie cutter...

PART 3:

Make a text layer with your name.  Use at least four effects to make your name pop.   Make sure the text layer is the top layer so that it is visible.

Use the brush tool to add embellishments to the background and/or collage.  Use at least three different brushes.


When you're done, print a copy for me and save your project as a JPEG in the student common folder in the COLLAGE ME folder.


I have developed this project based on a post from Paul Ferraris, a high school teacher in San Francisco.  Many thanks to Paul and the students at City Arts and Tech High School in San Francisco for the inspiration!

Thursday, May 9, 2013

Hybrid Animals Project!

Your challenge:
  • design a hybrid animal that reflects your personality and/or interests
  • use parts from at least 3 different animal species {head from one, body from a second, arms/legs/fins/wings/tails from a third+); you may use one of your own parts if you like
  • use only high resolution images for your project - no blurry or fuzzy pictures will be accepted
  • select or create an environment - can be indoor or outdoor and can be realistic or not
  • scale your animal properly for the environment
  • name your animal!  write the name creatively on the image using the text tool
  • sign your project with your initials or first and last name in the bottom right corner in a scripty font
Bonus points (not that you have grades in this class!) if you include yourself or someone else (with her/his permission of course) in your creation.  Are you excited to see your animal?  Fearful?  Feeding it?

Tools to use:

You will need use the magnetic lasso tool for sure.  You may also want to use color replacement, brushes, shapes, and more. 

Make your canvas 11x17 (or 17x11)!

Examples from last year:


Examples of hybrid animals:


Resources:

Thursday, May 2, 2013

Lyrics Project

Today we're going to start a new project in Photoshop.  Wahooooo!

This project will challenge you to use understanding of Photoshop layers as well as selection tools.  You will have plenty of room for creativity and customization!

Here are the steps:

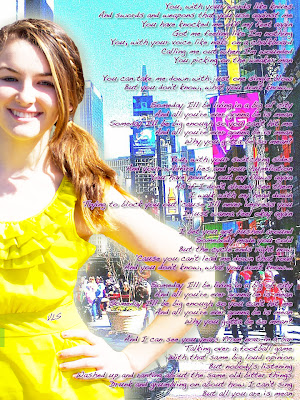
1.  Pick a song that you love and that speaks to you.  The lyrics must be appropriate for school!  I chose Mean by Taylor Swift.  Tori wants to live in NYC some day and she loves this song.

2.  Pick a picture of you that has pretty clear edges that will be easy-ish to cut out with the magnetic lasso tool.  You can do just a head shot, full body, profile, etc.  Anything works, so long as you can cut it out.  I chose a picture of Tori from Easter.  I like how her elbow sticks out and thought it would look kinda cool in the project.

3.  Pick a background. You can use a textured background, a graphic background, or a photo background.  It can be a background that you made or one that you grab online.  I used a photo that Tori took in NYC.


4.  Create an 8.5 x 14 canvas in Photoshop. Add your background image.  Duplicate that layer and then delete the original background layer.  Resize your background to make it fit the canvas.  Create a new layer, drag it to the bottom to be the background, and make it white (Edit --> Fill --> White).  This will allow you to alter your background image more easily.  Your layer panel should now look something like this:


5.  Open your portrait image in Photoshop.  You should now have two PS panels going. You can unsnap them by pulling one off the other.  Duplicate your portrait layer.  Use the magnetic lasso tool to cut out your portrait.  Choose LAYER VIA CUT after you have it cut out.  Drag the portrait cutout onto your background PS panel.  Your layer panel should now look something like this:


6.  Resize and reposition your cutout.  Make sure that your cutout layer is the one selected.  Then choose EDIT --> TRANSFORM --> SCALE.  Hold down the SHIFT key as you resize to maintain proper proportions.  Click on the MOVE tool and use it to reposition your cutout as needed.  If you want to rotate your cutout, choose EDIT --> TRANSFORM --> ROTATE.  

7.  Create a new layer and put it on top.  Drag a text box as big as you want and in the area that you want.    Paste the lyrics inside the box.  Pick your font, size, color, justification, etc.  Create cool text effects by choosing LAYER --> LAYER STYLE.  I used a bunch:


8.  Did you notice the small VLS I put on Tori's waistband?  I was able to add that pretty easily thanks to the copy and paste feature in PS.  I made a new layer, drew my text box in approximately the right place, and typed in Tori's initials.  Then I went to my layers panel.  I right clicked on the previous text layer and chose COPY LAYER STYLE.  Then I clicked on my new text layer and chose PASTE LAYER STYLE.  I quickly made the VLS on a slight angle using TRANSFORM --> ROTATE.


9.  You should now have most of your project done.  If you have time, you should play with the opacity, glow, shadow, hue, etc. for different layers.  Have fun! 


When you're done, save your project as a JPEG and post it to the blog so everyone can see it!

Monday, April 29, 2013

Dream Trip Project

I am super excited about our Dream Trip Project!  This is going to be a great way for you to picture yourself (literally) on a fantasy vacation as well as to learn some new Photoshop skills.

Dream Trip Project Directions:

  1. Select 3 or more pictures from your dream destination.  For example, if my dream destination is Paris, I might choose a picture of the Eiffel Tower, Monet's water lily gardens, and a quaint city street.  Please get all your pictures from the site Ookaboo, as *all* of the images are public domain or creative commons.  Download the FULL size images (best resolution) to your desktop.
  2. Select 3 or more pictures of you from your portraiture photo shoot.  Make sure they're on your desktop.
  3. Open Photoshop and create an 11x14 size canvas; give the canvas a black or white background.  The canvas can be horizontal or vertical.  It's up to you!
  4. Add your destination pictures.  You can arrange them in any way you want, but try to take up most of the canvas.  You can rotate and overlap them for a collage look or you can put them in neat rows.
  5. Add a large text box with your destination:  ex/"My Dream Trip to Paris!"
  6. Open a new window in Photoshop and open your first portrait.  Dupliate the layer and then get rid of the original background layer. Use the MAGNETIC LASSO tool to cut yourself out.  Select NEW LAYER VIA CUT.  Then drag your cutout over to your project canvas and arrange it so that you are "in" one of your destination photos (you will probably need to resize, rotate, etc.).  Repeat this with your other portraits until you appear in each destination photo.
  7. Optional:  Use brushes (default or add extras from Brusheezy) to accentuate your project.
When you're done, call me over to check it, and then we'll print it!  We'll also save it as a JPEG for your portfolio.

Thursday, April 25, 2013

Magnet Project - Intro to Photoshop

I am super excited about our first Photoshop project.  It involves some of my favorite things:  QUOTES, FONTS, PHOTOSHOP and... MAGNETS! 

Have you ever seen an image online with a quote on top of a background or photo?
Check out my Pinterest board of quotes for some examples:


Your next project is to make your own cool quote image.  You can pick any quote you want, so long as it is appropriate for school, and can use any image you want, so long as it's appropriate for school.

A good place to go for backgrounds is http://photoshopbackgrounds.com/

It will take us most of today to set up your project.  Tomorrow we will learn some more Photoshop tricks, finalize our projects, print, and create our magnets. 

The goals for this activity are:
  • to set up a canvas in Photoshop
  • to add and manipulate a background in Photoshop
  • to add and manipulate a textbox in Photoshop
  • to learn about layers in Photoshop
  • to learn the difference between saving as a Photoshop file and as a JPEG
  • to make a cool magnet!
Here is my sample:

Wednesday, April 24, 2013

Portraiture Day 1

Today we will begin exploring portraiture!  I am super excited because portraiture is one of my FAVORITE photography genres.  I love people...all different kinds of people...even the annoying ones.  Documenting their personalities through photography is an exciting challenge.  

Before you jump into your photography, I want you to take a few minutes to explore some portraits and get some ideas.  I used Pinterest to gather examples.  Click on the screenshot below to go to my Pinterest board with portraiture samples.  Come to the rug in four minutes with at least four ideas for portraiture.